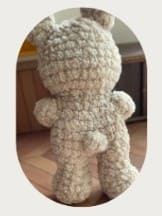
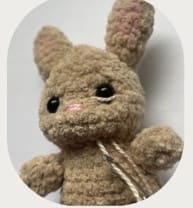
There’s something extra special about tiny handmade accessories, and this crochet bunny keychain pattern is a perfect example. Inspired by the photo, this little bunny features soft plush yarn, round glossy eyes, and delicate pastel overalls that give it a sweet, springtime charm. The gentle blush on the cheeks and the tiny bow between the ears make it feel thoughtful and full of personality.
If you’re looking for a small bunny keychain crochet pattern, this design is ideal. It’s compact enough to hang on your keys, backpack, or purse without feeling bulky, yet detailed enough to stand out. Using velvet or chenille yarn helps achieve that fluffy, cuddly texture, even in miniature form. The overalls, worked in soft lilac tones with subtle color speckles, add a playful contrast to the creamy white body.
Cute bunny keychain crochet pattern
A cute bunny keychain crochet pattern like this also makes a wonderful handmade gift. It’s quick to complete compared to larger amigurumi projects, which means you can create several in different colors for friends or craft fairs. The simple shaping, basic stitches, and small decorative touches make it approachable for confident beginners while still enjoyable for experienced crocheters.
Whether you attach it to your keys or gift it to someone who loves tiny amigurumi, this bunny keychain brings a bit of handmade warmth to everyday life. Small project, big charm — and definitely hard to make just one.
Designer: conkaboo
Materials:
(I used 2mm yarn loops and threads: petite pearl)
Buuny:
Tan yarn- less then 1 skein
Pink yarn- less then 1 skein
Jumper:
Green yarn- less then 1 skein
White yarn- less then 1 skein
Pink embroider thread
2mm crochet hook
6mm safety eyes
Polyfill
Yarn needle
Stitch marker
Scissors
Keychain ring
Abbreviations:
MR- magic ring
ch- chain
FO- fasten off
st- stitch
sc- single crochet
dec- decrease
inc- increase
R- row
Skill level: Easy.
Note: The following pictures in R8, are with a larger yarn for better viewing purposes.
Legs into body
Legs in tan X2:
R1. 6 sc in a MR (6)
R2. 6 inc (12)
R3. 12 sc (12)
R4. 2sc, 4dec, 2sc (8)
R5-R7. 8 sc (8) (3 rows)
Stuff and fasten off the first leg, make a second leg but don’t fasten off. Continue on to R8.
Step 1:
2 sc, chain 1. Insert your hook into the side of the first leg, making sure both legs are facing the same direction.

Step 2:
Work 1 sc into this space, then place a stitch marker in that stitch as the new start of the round. Continue to step 3.

Step 3:
Around the first leg: sc, inc, 2sc, inc, 2sc.
In the connecting chain: inc.

Step 4:
In the second leg: (2sc,inc)x2, 2sc
In the connecting chain: inc (24 total).

R9-R12. 24 sc (24) (4 rows)
Stuff the legs/body and continue to stuff as you go.
R13. (2sc,dec)x6 (18)
R14. 18 sc (18)
R15. (sc,dec)x6 (12)
The next rows will be forming the head.
R16. 12 inc (24)
R17. (3sc,inc)x6 (30)
R18-R19. 30 sc (30) [2 rows]
R20. (4sc,dec)x5 (25)
R21-R22. 25 sc (25) [2 rows]
R23. (3sc,dec)x5 (20)
Eyes between R20-R21. 5 stitches apart.
R24. (2sc,dec)x5 (15)
R25. (sc,dec)x5 (10)
R26. 5 dec (5)
Finish stuffing and FO, and leave a long tail to sew the head shut. Weave in loose ends.
Arms X2
In tan:
R1. 6 sc in MR (6)
R2-R5. 6 sc (6) [4rows]
FO, lightly stuff and sew the opening shut.
Sew onto the sides of body, with the arms pointing outwards. Roughly around R15-R16.

Ears X2
In tan:
R1. 6 sc in MR
R2. (sc,inc)x3 (9)
R3-R5. 4sc, (pink:2sc), 3sc (9) [3 rows]
R6. sc, dec, sc, (pink:dec), sc, dec (6)
R7. 3 dec
FO. Do not stuff. Fold in half and sew onto the top of the head.
Tail
In tan:
R1. Ch 2, in the 2nd ch from your hook, work 4 sc.
FO and sew to the back of your plush.
Face details
Cheek definition: repeat for both sides of the face.
1. Place your needle from the bottom of the head, and through to one side of the eye (1-2 stitches away) on a diagonal slant.

2. Then stitch across to the opposite corner of the eye and bring the needle back down one stitch away from your diagonal entry point.
3. Pull tight to create the cheeks. Then tie a tight knot with the excess thread, weaving in the ends afterwards.

Nose:
With pink embroidery thread, stitch a nose just under the eyes. Roughly 2 stitches wide.
Jumper
In green (any colour):
R1. ch 13 (note you may need to ch longer to fit your plush), sc in the first ch to join, then sc 12 around (13)
R2-R3. 13 sc (13) (2 rounds)
FO and repeat R1-R3 to make two pant legs, leaving a long tail to sew the gap shut. Don’t FO the second pant leg, continue to R4.
R4. (sc in the other leg to join, mark this stitch as the new start to our rounds, then sc 12 around the leg), (sc 13 around the other pant leg) (26)
R5. 26 sc (26)
Sew the gap between the pant legs closed.
R6-R8. 26 sc (9) (3 rounds)
For the next round, you can put the overalls on the plush to ensure a comfortable fit, and remove the stitch marker.
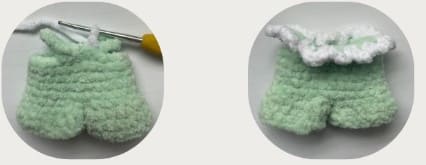
R9. Image A: (4sc, turn your work: 5sc,ch7),
Image B: (make a sc into the back of the jumper, roughly 9 stitches from the front flap).
Image C: (make 4 sc along the back of the jumper, ch7)
Image D: (slst into the last stitch of the front flap)
FO and weave in loose ends, the next step is adding the white trim.

Trim
White yarn:
We will be working the following stitches along the top of the jumper, and through the chain of the arm straps.
Insert your hook into the back of the jumper and slst, ch 4, skip a st and slst.
Ch 4, skip a st and slst into the chain of the arm strap.
Continue all the way around the perimeter.
FO, weave in loose ends.
Keychain
If you choose to make your plush into a keychain, place the keyring through the top of your plush’s head.
admin
Recommended To You