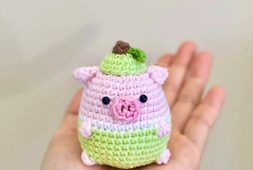
If you’re searching for an amigurumi bunny free crochet pattern, this style is perfect for intermediate beginners who are comfortable with basic stitches, shaping, and simple garment construction. The overalls can be made in contrasting pastel shades to highlight the bunny’s body color, just like the soft beige and lavender versions pictured.
A detailed, step-by-step crochet bunny pattern should include clear instructions for shaping the ears, securely attaching the limbs, and properly joining the overalls and carrot bag. This free amigurumi pattern will provide all of these. Even beginners can follow the instructions in detail and make it. The result is a charming, handmade rabbit that is personal, giftable, and truly special; a project that is both enjoyable to crochet and display. The amigurumi bunny, a beloved member of our crochet animals series, is now available for free. I hope everyone enjoys it and makes this bunny.
Crochet farmer bunny with carrot bag pattern
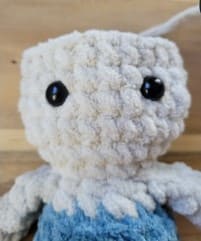
If you love soft textures and sweet handmade toys, this crochet bunny with overalls is the kind of project that instantly steals your heart. Inspired by the photo, this design features a plush, velvety bunny wearing tiny textured overalls and carrying a small carrot bag across its shoulder. The gentle facial details and rounded ears give it a calm, friendly expression that feels both modern and timeless.
This adorable amigurumi bunny with carrot works beautifully as a spring decoration, Easter gift, or nursery companion. The carrot purse adds a playful, countryside charm that makes the bunny feel like a little garden helper. Using chenille or velvet yarn will help you achieve that fluffy, cuddly look shown in the image, while simple embroidery keeps the face soft and expressive.
Designer: loren.crochets
Materials:
Yarn (I used bernat blanket)- you’ll need:
Body color
Overal color
Snout color
Carrot bag color (optional-see note in pattern)
Carrot bag top color (optional- see note in pattern)- I used premier basix chenille brights
Tail color
Hook to match yarn (I used 6.5mm)
Stitch markers
Safety eyes, if using (10-15mm recommended)
Yarn needle
4 weight cotton yarn (to embroider nose)
Scissors.
Abbreviations:
MR- magic ring
ch- chain
ss- slip stitch
sc- single crochet
dc- double crochet
inc- increase
dec- decrease
YO- yarn over
BLO- back loop only
FLO- front loop only
FO- finish off

Arms: (make 2 in body color)
Arms don’t get stuffed.
Round 1: 6sc in MR (6)
Rounds 2-6 (5 rounds): sc around (6) (30 total stitches)
Fold and 3 sc (through both loops) across the top to close.
FO. No need for a long tail. Arms are crocheted in.
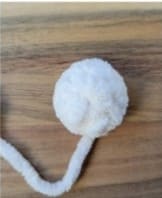
Snout: (make one in snout color)
Round 1: 6sc in MR (6)
Round 2: (sc, inc) x 3 (9)
Ss to first sc.
FO. Leave a 6-7″ tail to sew on later.
If you prefer to embroider the snout now, see ‘finishing touches’
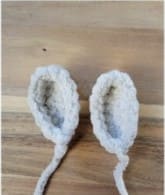
Ears: (make two in body color)
Ch 7
Round 1: starting in the second ch from hook, sc in each ch. (6) Working on the other side of chain, sc in each ch. (6)
Ss to the first st, ch 1 (12)
Round 2: sc in each of the first 5 sts, (inc) x 2, sc in the next 5 sts.
Ss to the first st. (14)
FO, leave a 6-7″ tail to sew on later.
Legs: (make two)
Begin with body color.
Round 1: 4sc in MR (4)
Round 2: (sc, inc) x 2 (6)
Change to overall color.
Rounds 3-4 (2 rounds): sc around (6) (12 total stitches)
FO first leg, leaving a 4″ tail to close the hole later.
Place a stitch marker in the first stitch of Round 4.
Tie the yarn tails from the color change to secure.
Do not finish off, the second leg. Continue on to the body.
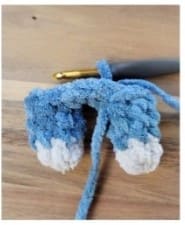
Body: (continue in overall color)
Round 5 connecting the legs: (18)
• Step one-chain 2 then SC in the marked stitch on the first leg (1st stitch of round 5). 5 sc around leg one. (6)
• Step two-inc in each chain. (4)
• Step three-6sc around leg 2. (6)
• Step four-sc in each chain. (2)


Round 6: 7 sc, (sc, inc) x 2,7 sc (20)
Note for Round 6: The increases [(sc,inc) x2] should be centered between the legs, due to tension, you might have to adjust your stitches.
Rounds 7-9 (3 rounds): sc around (20)
(60 total stitches)
Use the yarn tail from leg one to close the hole made from joining the legs.
Round 10: 8sc, (dec) x 2, 8sc (18)
Round 11: sc around (18)
Start stuffing. Change to body color to begin Round 12. Cut the overall color.
Round 12 (in body color): In BLO, (sc, dec) x 6 (12)
Tie the body and overall tails inside to secure.
We’re adding the arms in the next round. Due to tension, hook size, and yarn weight, you might have to adjust or shift your stitches. Arms should be on the sides of the body.
Round 13: 2sc, 3 sc (arm), 3sc, 3sc (arm), sc (12)
Finish stuffing. DO NOT Finish off. Continue to Head.
Head:
Round 14: (sc, inc) x 6 (18)
Round 15: (2sc, inc) x 6 (24)
Note for Rounds 16 & 17: These 2 rounds form Clover’s cheeks. Due
to tension, you might have to adjust your stitches so the inc and dec are on the side of the head.
Round 16: 6sc, (inc) x 2, 8sc, (inc) x 2, 6sc (28)
Round 17: 6sc, (dec) x 2, 8sc, (dec) x 2, 6sc (24)
Rounds 18-19 (2 rounds): sc around (24) (48 total stitches)
Add eyes, if using, between rounds 17 and 18, 3-4 stitches apart. “if you use smaller eyes, 3 sts apart; larger eyes, 4 sts apart.
Stuff head and continue to stuff as you go along. Add a bit more stuffing to the cheeks (rounds 16 & 17) so they’re more pronounced.
Round 20: (2sc, dec) x 6 (18)
Round 21: (sc, dec) x 6 (12)
Round 22: dec x 6 (6)
FO and leave a 6-8” tail to close. Thread the tail through your yarn eedle and weave through the front loops of Round 22. Hide tail inside.
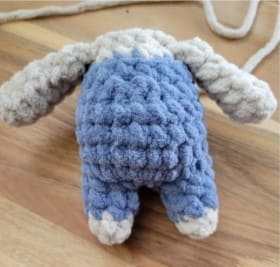
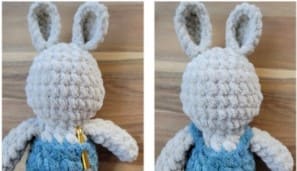
Attaching the Ears:
Sew the ears onto the top of the head between Rounds 21 & 22. The ears should line up with the center of the arms – (see pic) Secure tails and hide inside.

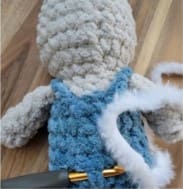
Overall Straps: (use overall color)
With Clover facing you, insert hook in Front Loop of Round 11 (approx. st 8)
• Ch 6. Bring it over the shoulder and attach it to the back (front loop of Round 11). FO. Hide tails.
• Repeat on the other side for the second strap. (insert the hook at approx. st 11). FO. Hide tails.
Tail (optional)
Use body color or fur yarn.
1- Insert hook between rounds 7 & 8. (NOTE: leave a 3-4″ beginning tail) Pull up a loop, ch 1
2- 5 dc bobble.ch 1
FO, leaving a 3-4″ tail. Thread the tail through a yarn needle and insert it into the stitch and back out to meet the beginning yarn tail. Tie them together and hide inside.
Note- Pocket and Bag: The bag sits better on Clover without the pocket. Yes, you can absolutely do both the pocket and the carrot bag. Just please keep this in mind.
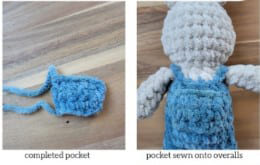
Pocket: (use overall color)
Ch6.
Row 1: starting in the 2nd ch from hook, sc in each ch. ch1, turn (5) Row 2: sc in each st. ch1, turn (5)
Row 3: sc in each st. (5)
FO. Leave a 7-9″ tail.
Attach the pocket:
Thread your yarn needle with the tail. Center the pocket in front
of Clover so that the bottom is between Rounds 7 & 8. Stitch
down the side, along the bottom, and back up the side. FO and hide tail inside.
Carrot Bag (begin with carrot bag color)
Round 1: 4sc in MR (4)
Round 2: (sc, inc) x 2 (6)
Round 3: (2sc, inc) x 2 (8)
Round 4: sc around (8)
Change to carrot bag top color.
Round 5: sc in each st around (place a stitch marker in the 4th st to
mark for the strap). ss to the 1 st (8)
(tie tails from color change and hide) DO NOT CUT YARN. Move on to the strap. Strap-ch 25. Insert hook into stitch 4 (the one w/the stitch marker). ch 1.
FO. Weave in ends and hide all tails.

Finishing Touches:
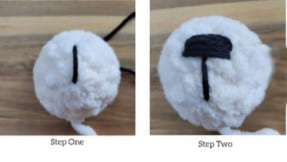
Embroider the snout (use 4 weight cotton yarn):
1- Make the line’. Thread your yarn needle with the yarn. Insert into the
MR. Come back up to R2. FO, tie the ends to hide inside.
2- Thread your yarn needle with the yarn. Stitch the nose onto R2, 3 passes across. FO, tie the ends to hide inside.
Attach the snout:
Thread the needle with the snout yarn tail. Center the snout so that the bottom is between Rounds 14 & 15 and the top is between Rounds 17 & 18. If you want to stuff your snout, stuff it lightly before closing.
admin
Recommended To You