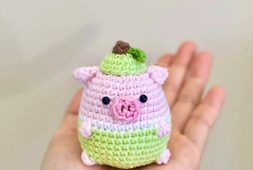
A tiny character project like a crochet super mario free pattern is a great way to add a bit of fun to your amigurumi collection. This small plumber doll is designed to be simple, playful, and quick to finish. Because the design is compact and mostly no-sew, it’s perfect for crocheters who enjoy fast projects that still have lots of personality.
One reason a super mario crochet pattern free for beginners is so popular is its straightforward construction. Instead of making many separate pieces, the head, body, and hat are often worked in one continuous shape. This keeps the process smooth and beginner-friendly while also helping the doll keep a neat and tidy look.
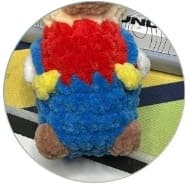
The character’s classic style comes together with a few simple color changes. Red yarn forms the famous cap and shirt, while blue creates the little overalls. A small beige section shapes the face, and tiny details like the round nose and mustache complete the look. Even with a minimal design, the finished doll clearly resembles the well-known gaming plumber.
No-sew crochet super mario free pattern
This tiny design can also be described as a crochet plumber man project that works up surprisingly fast. Because of its small size, it’s perfect for turning into a keychain, backpack charm, or a cute desk decoration.
Projects like this are a wonderful example of a beginner-friendly crochet doll pattern. The simple stitches and small size make it a relaxing project, while the recognizable character makes the finished piece extra fun to display or gift.
Designer: talentlys_crochet
Abbreviations:
MR- magic ring
ch- chain
sc- single crochet
slst- slip stitch
inc- increase
dec- decrease
hdc- half double crochet
dc- double crochet
FLO- front loop only
BLO- back loop only
BOB- 5 st bobble stitch
MBOB- 3 st bobble stitch
Materials:
Size 6 plush yarn (red, blue, white, beige, brown and yellow)
4.5mm crochet hook.
Yarn needle.
Scissors.
Safety eyes.
Polyester stuffing/filling.
Stitch marker.
Hat and head
Start with red yarn.
R1. 8 sc into a MR (8)
R2. (inc)x8 (16)
R3-5. sc around (16) – 3 rnds
CC to beige:
R6. 4sc, (BLO: 8sc), 4sc (16)
R7. sc around (16)
R8. (dec)x8 (8)

Add safety eyes between rnds 6&7 with 4sts between them. Make sure the eyes are centered below where you did the BLOs on Rnd 6 as this is where you will be making the hat brim later.
Stuff as you go from here.

Note: Place a st marker in the first and last unused front loops on rnd 6 to find them later when creating the brim of the hat.
Body
CC to red yarn:
R9. (inc)x8 (16)
R10. sc around (16)
R11. 5 sc, BOB (in white), 7sc, BOB (in white), 2sc (16)
CC to blue and FO red and white.
R12-14. sc around (16) – 3 rnds
R15. 8 sc, BOB (in brown), 4sc, BOB (in brown), 2 sc (16)
FO brown.
R16. (dec)x8 (8)
FO and leave a short tail to close hole.
Finish stuffing and then close.

Note: You may need to adjust the BOBs 1-2 sc to make sure they are aligned with the eyes.
Finishing touches:
Hat brim:
Attach the red to the first unused front loop of rnd 6. Working across: slst, 6 hdc, slst.
Nose:
Surface crochet a MBOB st on rnd 7 centered between the eyes. Use beige yarn.

Mustache:
You will make 3 little pieces around the sides and bottom of the nose. Use brown yarn. Start on the right side of the nose and surface crochet: slst, ch 1.
Continue this under the nose and then on the left side of the nose.

Overall straps:
You will be embroidering the straps. Start by pulling your needle out of rnd 12 1-2 sts away from the white BOB. Now insert your needle at rnd 8 directly above the white BOB. Lastly pull your needle out from rnd 12 1-2 sts away from the white BOB on the other side. You should have a triangle shape looking from the side. Do the same for the other strap.

Embroider a “M” on the front of the hat using blue yarn.

Straps buttons:
Felt buttons: cut out small circles of yellow felt and glue or sew them to the bottom of the straps on the front side.
Yarn buttons: attach your yarn, ch 1 and then slst over the strap at rnd 12.
Ears:
You will be surface crocheting the ears. You will be working under the st right behind the edge of the hat brim on rnd 6. Ch 2, slst into the 1st ch and then slst back into the same st on the head. Make one on each side.

admin
Recommended To You