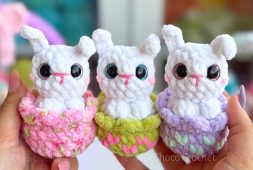
This crochet bunny amigurumi is the perfect mix of soft texture, playful color, and handmade charm. Its tiny ears, round shape, and fluffy finish make it a standout project for spring decor, Easter baskets, or cute gift ideas. Among popular crochet stuffed animals, bunny designs always have a special place because they are timeless, easy to personalize, and loved by all ages.
Stuffie little crochet bunny pattern
Many makers search for a crochet bunny amigurumi free pattern when they want something adorable that also feels relaxing to crochet. This type of project works beautifully with pastel yarns, multicolor plush textures, or simple classic shades for a sweeter look. It can also be paired with other mini animal plushies to create a full handmade collection.
Whether you are building content for your crochet blog or simply making something cute for fun, this bunny design offers a cozy, eye-catching result that feels warm, creative, and truly special.
Designer: knotsbyfi
Materials and tools
7mm crochet hook
Yarn needle
Stuffing
Safety eyes
Stitch markers
Scissors
Any 6 weight super bulky blanket or chenille style yarn will work.
Small amount of any yarn for nose embroidering.
Abbreviations:
ch- chain
MR- magic ring
sc- single crochet
hdc- half double crochet
dc- double crochet
slst- slip stitch
bob-6l- bobble stitch with 6 loops
bob-4l- bobble stitch with 4 loops
inc- increase
dec- decrease
Head and body
7mm hook:
R1: 8sc in mr (8)
R2: sc around (8)
R3: (sc, inc) x4 (12)
R4: (2sc, inc) x4 (16)
Insert safety eyes now between R2-3, 4-6 stitches apart.
Start stuffing as you go.
R5: (dec) x8 (8)
R6: (inc, sc) x3, inc, BOB-4L (12)
R7: sc, BOB-4L, (inc, 2sc) x3, inc (16)
R8: sc around (16)
R9: (3sc, inc) x4 (20)
Before working the next two BOB stitches, “see PICS”. You may have to move a stitch or two over depending on tension.
R10: 17sc, BOB-6L, 2sc (20)
R11: 2sc, BOB-6L, 17sc (20)
R12: (dec, 2sc) x5 (15)
R13: (dec) x7, sl st (8)
Eyes placement:

FO, finish stuffing, close the hole and weave in the ends.

Ears
7mm hook
The ears are worked directly onto the head into rows.
Leave 1-2 visible stitches between the ears.
If you want longer ears, work extra rows to the desired length.
R1: Insert the hook between R4-5, pull up a loop & ch1, “into the same space” 2hdc (2)
R2-3: ch1 & turn, 2hdc (2) two rounds total.
Continue by adding slip sts down the side of the ear back to the head: Ch1, sl st into the side of R2, ch1, sl st into the side of R1, ch1, sl st into where you started the ear.
FO. Weave in the ends. Repeat this process for the second ear.

Nose
Embroider a “y” shaped nose using the mr as the centre.
“See PICS”.

You can fill in the top of the “y” for the fuller look.
Tail
The tail is worked directly off the body. Using a fur or contrasting coloured yarn.
With the nose facing you, find the centre top of R11. Insert the hook pull up a loop & ch1, “into the same space” work a BOB-4L, FO tie the two tails together and weave in the ends.

admin
Recommended To You