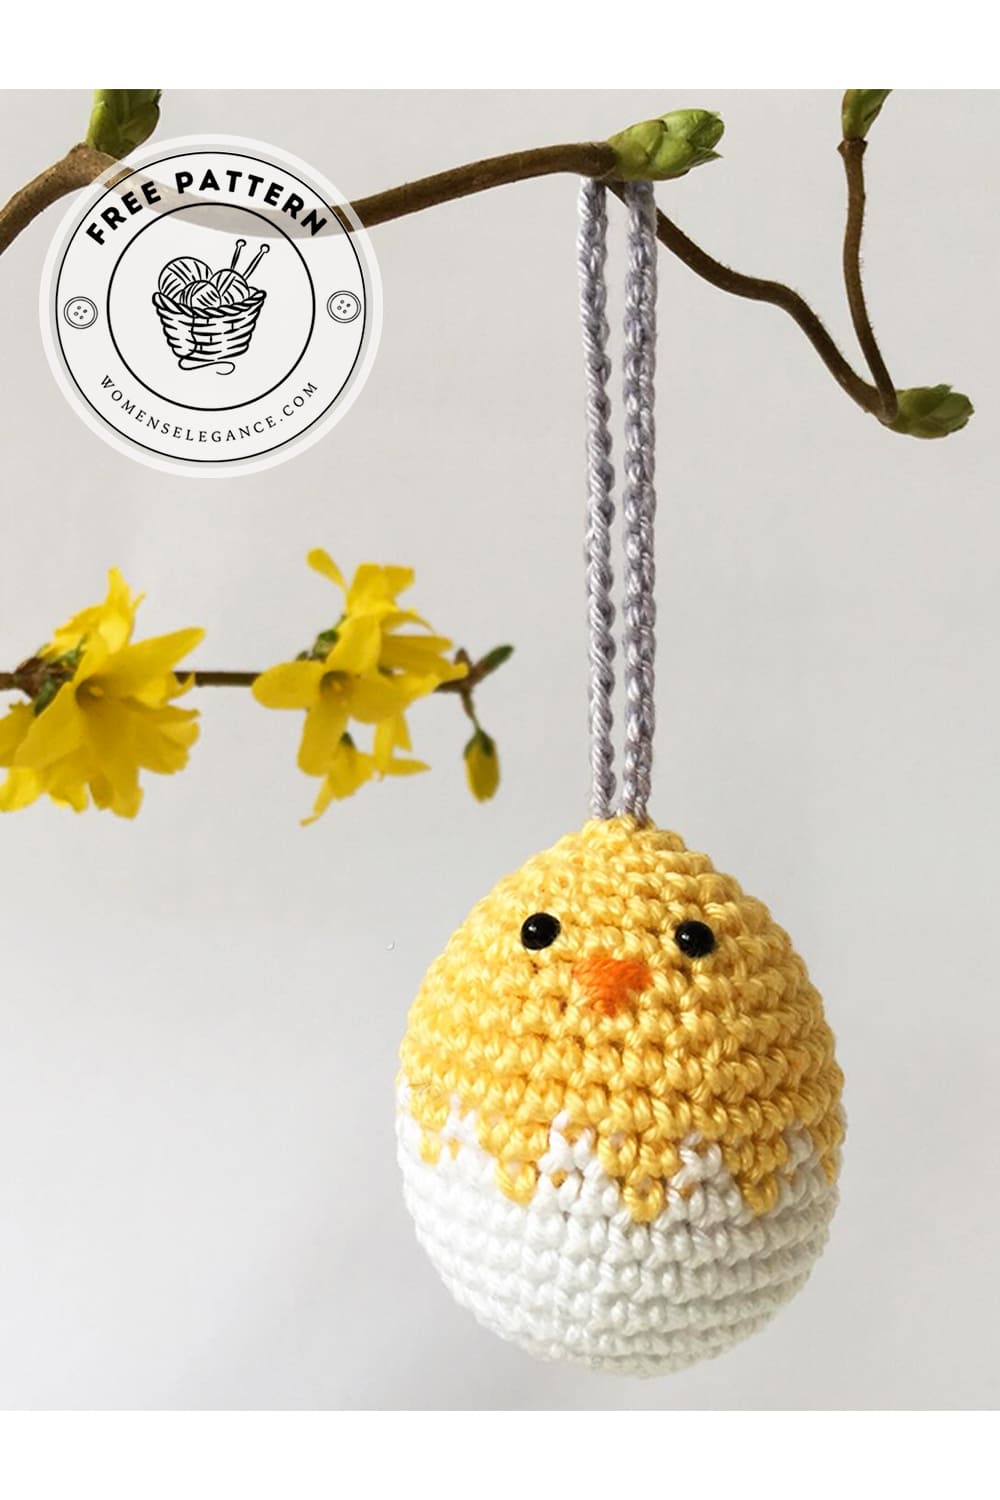
This adorable spring project is perfect for anyone looking for a crochet easter eggs free pattern with a playful twist. Designed as a sweet little chick peeking out from a shell, this handmade decoration adds warmth and charm to Easter baskets, nursery décor, or seasonal gift tags. If you enjoy cute amigurumi-style designs, this is a fun and beginner-friendly idea to try.
Crochet easter egg chick pattern
A crochet chick egg cover pattern is a creative way to turn a simple egg shape into something extra special. With soft yellow yarn for the chick and white yarn for the cracked shell, the finished piece looks cheerful, cozy, and perfect for spring decorating. Small details like embroidered cheeks or safety eyes can make every chick unique.
This crochet easter egg chick pattern also works beautifully as a hanging ornament, table decoration, or thoughtful handmade gift. It is quick to make, easy to customize, and ideal for using leftover yarn from your stash. Whether you are creating Easter décor for your home or adding fresh ideas to your crochet collection, this cute chick-in-an-egg design is a lovely seasonal project.
Designer: craftyemmi
Materials:
2.5 mm crochet hook
Embroidery needle
Sport weight yarn in 3 colors (A-white, B-yellow, C-lilac)
Orange embroidery yarn
4 mm black eyes
Soft stuffing
Abbreviations:
Rnd- round
st- stitch
sc- single crochet
sc2tog- 2 st together with sc (decrease)
Chick easter egg
Rnd 1. 6 sc in magic ring
Rnd 2. *2 sc in next sc* 6x [12]
Rnd 3. *2 sc in next sc, 1 sc* 6x [18]
Rnd 4. *2 sc in next sc, 2 sc* 6x [24]
Rnd 5. *2 sc in next sc, 3 sc* 6x [30]
Rnd 6. *2 sc in next sc, 4 sc* 6x [36]
Rnd 7. 36 sc
Rnd 8. 36 sc
Rnd 9. 36 sc
Rnd 10. *2 sc, 1 sc* 12x
Rnd 11. 1 sc, *1 sc, 2 sc* 11x, 1 sc, 1 sc
Rnd 12. 1 sc, 1 sc, 34 sc
Rnd 13. 36 sc
Rnd 14. *7 sc, sc2tog* 4x [32]
Rnd 15. *6 sc, sc2tog* 4x [28]
Rnd 16. *5 sc, sc2tog* 4x [24]
Rnd 17. *4 sc, sc2tog* 4x [20]
Place the eyes between Rnd 16 and 17, 4 st apart (counted in rnd 16).
Embroider the beak in rnd 15.
Stuff the egg.
Rnd 18. *3sc, sc2tog* 4x [16]
Rnd 19. *2sc, sc2tog* 4x [12]
Rnd 20. *1sc, sc2tog* 4x [8]
Finishing
Fasten off and leave a long tail to close the hole. But before closing make a hanger:
Change to color C, leave a long thread at the beginning and crochet chain stitches (approx. 14 cm). Fasten off and leave a long thread again. Knot both threads to make a loop and cut the ends short.
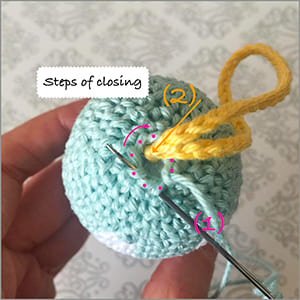
To close the hole, thread the long tail onto a needle (see next picture, it shows the < steps of closing):
(1) Insert the needle into the next front loop from the outside to the inside. Repeat for the next 7 stitches. (2) When you have drawn the thread through each stitch, put the knotted part of the loop into the opening and pull the thread tight.
Draw the thread through the loop too and tie a knot to secure.
Weave in the end.
admin
Recommended To You