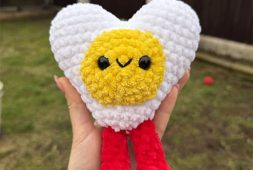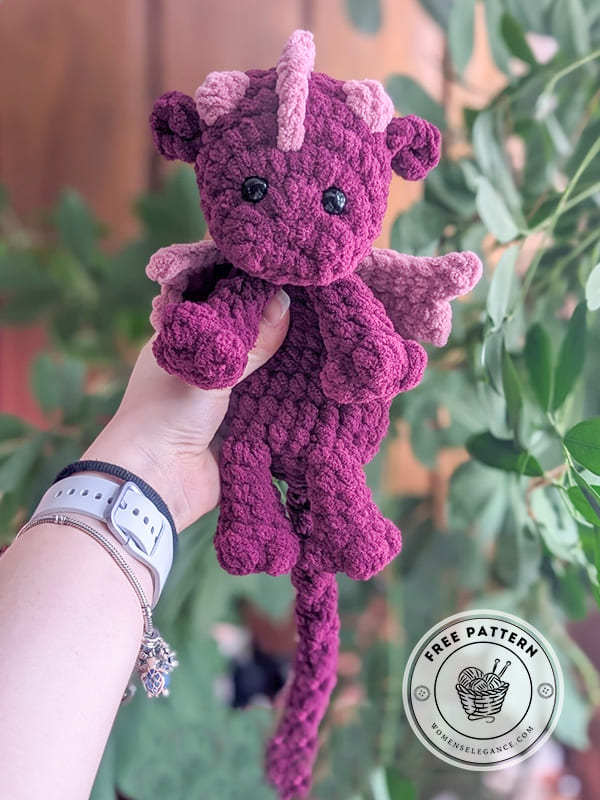
If you’ve ever wanted to bring a little fantasy into your crochet projects, a free crochet dragon pattern is the perfect place to start. Dragons may look complicated, but with the right step-by-step instructions, they’re surprisingly fun and relaxing to make. Whether you prefer a tiny pocket-sized creature or a larger statement piece, there’s a design out there that fits your skill level.
A well-written crochet dragon amigurumi free pattern usually includes clear shaping details for the head, body, wings, and tail. Most patterns use basic stitches like single crochet, increases, and decreases, making them suitable even for confident beginners. You can customize your dragon with bright colors, sparkly yarn, or even tiny embroidered details to give it personality. From soft pastel baby dragons to bold, fiery red guardians, the possibilities are endless.
Free crochet dragon pattern
Choosing a free amigurumi pattern also allows you to experiment without pressure. You can practice shaping techniques, try new yarn textures, and adjust sizes by simply changing your hook. Handmade dragons make thoughtful gifts for fantasy lovers, kids, or anyone who appreciates whimsical décor.
The best part is that every dragon turns out a little different. Small variations in tension or stuffing can give your amigurumi a unique expression. So grab your yarn, pick your favorite colors, and start stitching your own magical companion today.
Designer: merutoys
Abbreviations (US Terms)
Mr: magic ring
Rnd: round
st, sts: stitch, stitches
Ch: chain stitch
SI st: slip stitch
dec: decrease
inc: increase
sc: single crochet
hdc: half double crochet
bobble stitch: a bobble stitch made of X partially double crochet stitches.
• If you use the recommended hook and yarn, the finished toy will measure approximately 50 cm.
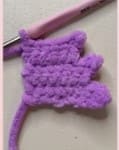
Arms (make 4)
Begin with pistacio green yarn. Use 6.50 mm hook. Work in spiral rounds. Do not stuff the arm.
Rnd 1: 8 sc in MR [8]
Rnd 2: 2 sc. (bobble stitch, sc)* 3[8]
Rnd 3: 8 sc [8]
Rnd 4: dec, 6 sc [7]
Rnd 5: 5 sc, dec[6]
Rnd 6: dec, 4 sc [5]
Rnd 7:3 sc, dec [4]
Sl st and fasten off. Set the arms aside for now. They will be crocheted onto the body later.
Wings (make 2)
Begin with orchids colored yarn. Use 6.50 mm hook. Work in rows.
Chain 9
Row 1: Starting in the 2nd ch from hook, 8 sc. Ch 1, turn your work. [8]
Row 2: 6 sc, leave last 2 sts unworked. Ch 2, turn your work. [6]
Row 3: Starting in the 2nd ch from the hook 7 sc. Ch 1, turn your work. [7]
Row 4: 5 sc, leave last 2 sts unworked. Ch 2, turn your work. [5]
Row 5: Starting in the 2nd ch from the hook, 6 sc. [6]
Make 5 sc evenly down the side of the wing edge, ending at the starting stitch.
Leave a long tail for sewing.
Tail & Body
Begin with pistacio green yarn. Use 6.50 mm hook. Work in spiral rounds. Do not stuff the tail and body.
Rnd 1:4 sc in a MR [4]
Rnds 2-19: 4 hdc (18 rounds) [4]
Rnd 20: hdc inc *4[8]
Rnd 21: hdc inc *8 [16]
Rnd 22: (3 hdc, hdc inc)*4[20]
On Rnd 23, join the 2 arms to the body. Flatten the top parts of the pieces. Ensure the arms are facing forward.
Rnd 23: Make 7 hdc on the body, crochet 2 hdc through both the body and the arms stitches.
Then work 2 hdc on the body, join the second arm to the body by working 2 hdc the body and the arms stitches and continue with 7 hdc on the body. [20]
Rnd 24-25: 20 hdc (2 rounds)[20]
Rnd 26: (3 hdc, hdc dec)* 4[16]
Rnd 27: (2 hdc, hdc dec)*4 [12]
Rnd 28: (1 hdc, hdc dec)*4 [8]
Rnd 29: Make 3 hdc on the body, crochet 2 hdc through both the body and the arms stitches.
Then work 1 hdc on the body, join the second arm to the body by working 2 hdc the body and the arms stitches. [8]
Slst and fasten off.
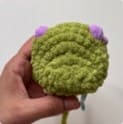
Head
Begin with pistachio green yarn. Use 6.50 mm hook. Work around foundation chain. Stuff the head as you go.
Chain 6
Rnd 1: Starting in the 2nd ch of the hook; inc, 3 sc, 3 sc into the last chain, rotate your work 4 sc [12]
Rnd 2: 2 sc, (3 sc into the same stitch)*3, 7 sc[18]
Rnd 3:3 sc, 2 inc.(2 inc, sc)*2, 7 sc [24]
Rnd 4-5: 24 sc (2 rounds) [24]
In Rnd 6, make bobble stitches using orchid-colored yarn.
Rnd 6: 7 sc, bobble stitich, 5 sc, bobble stitch, 7 sc, do not complete the last 3 sc of the round. Place the stitch marker in the last worked stitch. This becomes the new beginning of the round.
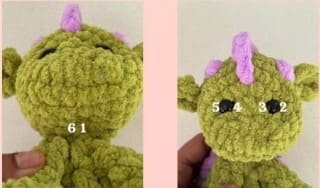
Eyes Placement
Insert safety eyes between Rnd 2 and Rnd 3. Place the eyes symmetrically on the front of the head so that the increase stitches from Rnd 3 are centered between them. There should be 4 visible stitches between the eyes. Make sure the eyes are aligned with the horns before securing the safety backs firmly.
In Rnd 7, crochet the body to the head. Position both the head and the body with the back sides facing you. The body ends with 8 stitches. Flatten the opening and join it by crocheting 4 sc through opposite stitches. Ensure the head is aligned properly and facing forward before securing it to the body.
Rnd 7: Join body to the head with 4 sc, 20 sc [24]
Rnd 8: (4 sc, dec) 4 [20]
Rnd 9: (3 sc, dec)*4 [16]
Rnd 10: (2 sc, dec)*4 [12]
Rnd 11: (1 sc, dec)*4[8]
Rnd 12: 4 dec[4]
Using a needle, thread the yarn through the remaining 4 stitches and pull tight to close. Secure and fasten off.

Right Ear
Make the ear in Rnd 6. Hold the head with the face facing you and work the ear 2 stitches behind the bobble stitch. Insert the hook into the indicated stitch and attach yarn with a sl st, ch 2, work 4 hdc into the same stitch in to the first chain, ch 2, sl st into the same stitch. Pull tight to secure, fasten off.
Left ear
Work the left ear in Rnd 6, 2 stitches below the bobble stitch. Repeat the same steps as the right ear.

Spikes
Attach Orchid color yarn to Rnd 2 of the tail. Rnd 2: (3 sc, hdc, ch 1, hdc in the same st) x 10, (hdc, ch 1, hdc in the same st), 2 sc. Fasten off and weave in the ends securely.
Wing Assembly
Sew the wings on both sides of the spikes, leaving the spikes centered between them. Attach the wings between Rnd 29 and Rnd 26 of the body.
Face Shaping
Use a green cotton yarn. Thread the needle.
1. Insert the needle between the stitches at the bottom of the head at point 1 (Rnd 6). Measure the distance between the two eyes and find the exact center point; use this as the alignment. Bring the needle out at the bottom of the right eye at point 2.
2. Insert the needle into the top of the same eye at point 3, then bring it out at point 4.
3. Insert the needle into point 5 and bring it out at point 6.
Gently pull both thread tails until the eyes are positioned correctly, then tie a secure double knot.
Cut the yarn and hide the thread tails inside the head.
admin
Recommended To You