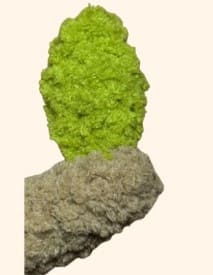
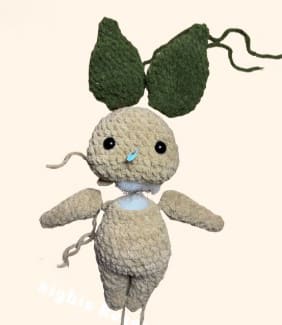
If you’re looking for a fun and magical amigurumi crochet pattern, the baby amigurumi mandrake free pattern is perfect for you. Inspired by fantastic and adorable crochet plant characters, this design adds a charming touch to traditional amigurumi toys. With its tiny leaves, sweet facial details, and soft texture, this mandrake is a candidate to become a favorite in your amigurumi collection.
This pattern is designed for beginners, but offers enough detail to keep experienced crocheters busy. By working on this project, you can improve your crochet mandrake skills and create a unique handmade figure. The instructions are clear and easy to understand, helping you enjoy every step of the process.
Free mandrake amigurumi pattern
The pattern also allows for creativity. You can change yarn colors, adjust facial expressions, or add accessories to truly personalize your mandrake. Overall, this crochet mandrake design is a great way to hone your skills while creating something cute and original. If you love fantasy-inspired amigurumi, this pattern is definitely worth trying.
Designer: redmills_crochet
Materials:
• 2 colors of any yarn you prefer, I used alize softy plus for this project.
• A crochet hook: 4 mm.
• Safety eyes: 14 mm.
• Poly-fill fiberfill.
• A yarn needle.
• Stitch markers.
• Scissors.
• Optional: pink yarn or marker for blush.
Terms to know:
Rnd: round
ch: chain
inc: 2 stitches in 1 stitch
sc: single crochet
slst: slip stitch
dec: decrease
The legs
Worked in rounds, make 2:
R1: ch 2, 3 sc into the 2nd chain from the hook. (3)
R2: 2 sc, inc (4)
R3: 4 sc around (4)
R4: 3sc, inc (5)
R5: 4sc, inc (6)
R6: 6 sc around (6)
R7: 5sc, inc (7)
R8: 6sc, inc (8)
R9: 8 sc around (8)
R10: (3sc,inc)x2 (10)
R11: (4sc,inc)x2 (12)
FO, first but not 2nd, we will continue on to the body, stuff the legs and then stuff/shape the body as you go.
You can leave a long tail from leg one to optionally sew the legs together at the end.
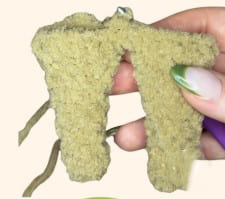
The body
Continue from leg 2:
Stuff and shape as you go:
R1: Connect the two legs with a sc from leg 2 into leg 1, continue with 11 more sc around leg 1, then 12 sc around leg 2 (24)
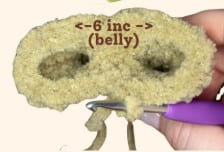
Increase in the next round should be centered on the front of the body.
R2: 9 sc, 6 inc, 9 sc (30)
R3-5: 3 rnds of 30 sc (90 sc total)
Dec in the next round should be centered on the sides of the body.
R6: 4sc, 3dec, 10sc, 3dec, 4sc (24)
R7-8: 2 rnds of 24 (48 sc total)
Dec in the next round should be centered on the front of the body.
R9: 6sc, 6 dec, 6sc (18)
R10: (7sc,dec)x2 (16)
R11: 16 sc around (16)
FO, no tail needed for sewing, we will leave one with the head.
The 6 inc in R2 are the bottom of the belly, they should be centered to what will be the front.
The head
Worked in rounds, make 1:
R1: ch 2, 8 sc into the 2nd chain from the hook. (8)
R2: inc the rnd (16)
R3: (1sc,inc)x8 (24)
R4: (3sc,inc)x6 (30)
R5-8: 30 sc around for 4 rnds (120 sc total)
R9: 3 inc, 5sc, 3 inc, 19 sc (36)
R10: 36 sc around (36)
R11: 3dec, 5 sc, 3 dec, 19 sc (30)
R12: (3sc,dec)x6 (24)
R13: (sc,dec)x8 (16)
FO and leave a tail for sewing to the body.
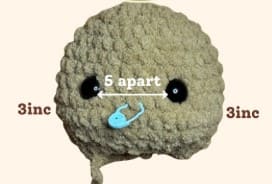
Insert safety eyes between rnds 8 & 9 about 5-6 stitches apart (I like to place mine right over the 3rd and the 4th increases of R9).
Stuff and shape the cheeks.
Use a stitch marker on the 9th stitch of R9 to mark the center of the face for later.
The arms
Worked in rounds, make 2:
R1: ch 2, 3 sc into the 2nd chain from the hook (3)
R2: 2sc, inc (4)
R3: 4 sc around (4)
R4: 3sc, inc (5)
R5: 4sc, inc (6)
R6: 6 sc around (6)
R7: 5sc, inc (7)
R8: 6sc, inc (8)
R9: 8 sc around (8)
R10: (3sc,inc)x2 (10)
R11. 10 sc around (10)
R12: 4dec, 2sc (6)
Stuff lightly.
Press in half and 2-3sc across to close the hole.
Leave a tail to sew to the body.

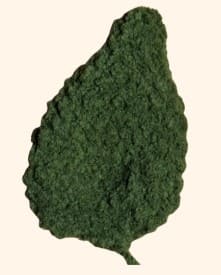
Now we’re going to make the leaves on the mandrake’s head.
Large leaves
Worked in rounds, make at least 2-3:
R1: Ch 2, 4 sc into the 2nd chain from the hook (4)
R2: (sc,inc)x2 (6)
R3: 6 sc around (6)
R4: (2sc,inc)x2 (8)
R5: (sc,inc)x4 (12)
R6: (3sc,inc)x3 (15)
R7: (4sc,inc)x3 (18)
R8-R9: 18 sc around for 2rnds (36 sc total)
R10: (5sc,inc)x3 (21)
R11: (6sc,inc)x3 (24)
R12: 24 sc around (24)
R13: (sc,dec)x8 (16)
R14: 8 dec (8)
Do not stuff.
Press in half and 4 sc across to close the hole.
Leave a tail to sew to the head.
Now we’ll move on to the little leaf. Secure the large leaves to the head.
The little leaves
Worked in rounds, make at least 1:
R1: Ch 2, 4 sc into the 2nd chain from the hook (4)
R2: 4 sc around (4)
R3: 4 inc (8)
R4-R5: 8 sc around for 2 rnds (16 sc total)
R6: (2sc,dec)x2 (6)
Do not stuffing.
Press in half and 3 sc across to close the hole.
Leave a tail to sew to the arms.
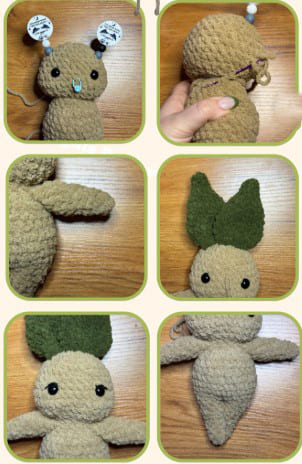
Assembly:
Head to body:
Use the last round of the body and the last round of the head to sew the two pieces together.
Make sure the head is centered to the front with the belly.
Arms to body:
Find a position you’d like the arms to be in, use the last couple of sc’s to secure them to the body and a couple of the stitches on the side to further secure them if you don’t want them to be floppy.
Large leaves to head:
Sew the large leaves onto the top of the head.
Position is your prefence, I like yo have them centered but staggered so you can see them all.
Small leaves to arms:
If you made the small leaves, sew them on to the ends of the arms like they are branches.
Finishing touches:
Sew the legs together if you’d like.
Feel free to add blush.
admin
Recommended To You