Bring a touch of whimsy to your Easter décor with a crochet carrot with bunny inside! This adorable project combines the charm of a classic carrot with a hidden surprise—a tiny amigurumi bunny peeking out. Perfect for gifting or as a centerpiece, it’s a playful way to celebrate the season.
For crafters looking for detailed guidance, the carrot bunny crochet pattern makes it easy to create this delightful piece. Using simple stitches, even beginners can enjoy bringing this Easter-inspired project to life. The carrot’s bright orange body and green leafy top perfectly complement the soft, cuddly bunny tucked inside.
Crochet carrot bunny pattern
If you want to expand your collection, try the crochet easter bunny pattern or the amigurumi easter bunny pattern, both of which allow you to craft charming little bunnies for decoration, gifts, or tabletop displays. Combining these patterns with the carrot design adds variety and fun to your holiday crafting.
Whether you’re an experienced crocheter or a beginner, this project is a cheerful way to bring a handmade, festive touch to Easter celebrations.
Designer: olya.usolya
Materials:
Himalaya dolphin baby (131 yd/ 3.5 oz) 1/3 skein- 80316
LaVita yarn velur (131 yd/3.5oz) 1/20 skein- 8161
Himalaya dolphin baby (131 yd/3.5 oz) 1/5 skein- 80301
Himalaya dolphin baby (131 yd/3.5 oz) a little bit for the cheeks- 80309
3.5 – 3.75 mm crochet hooks.
Black cotton thread for embroidering the eyes, mouth, and the lines on the carrot.
Stuffing.
A needle for sewing the body parts together and embroidering the details on the carrot.
Abbreviations:
MR- magic ring
ch- chain
slst- slip stitch
sc- single crochet
hdc- half double crochet
dc- double crochet
inc- increase
dec- decrease
BLO- back loop only
FLO- front loop only
cc- change color
Upper paws- 2 pieces
Do not stuff.
R1. 6 sc in MR
R2. (sc,inc)x3 (9)
R3. 9 sc
R4. 3sc,3dec (6)
R5-6. 6 sc
Ch, fold the piece in half and join both sides together by working 3 sc;
Fasten off and cut the yarn.

Ears- 2 pieces
Do not stuff.
R1. 6 sc in MR
R2. (sc,inc)x3 (9)
R3. (2sc,inc)x3 (12)
R4-6. 12 sc (3 rounds)
R7. (2sc,dec)x3 (9)
R8-9. 9 sc (2 rounds)
R10. (sc,dec)x3 (6)
Ch, fold the piece in half and join both sides together by working 3sc;
Fasten off and leave a long tail for sewing.

Tail
Stuff lightly.
R1. 6 sc in MR
R2. 6 inc (12)
R3. 12 sc
R4. 6 dec (6)
Close the opening and leave a long tail for sewing.

Body
Start with orange yarn.
Stuff as you go.
R1. 6 sc in MR
R2. 6 inc (12)
R3. (sc,inc)x6 (18)
R4. (2sc,inc)x6 (24)
R5. 24 sc
R6. (3sc,inc)x6 (30)
R7. 30 sc
R8. (4sc,inc)x6 (36)
R9. 36 sc
R10. (11sc,inc)x6 (39)
R11. 39 sc
Work with white yarn in the areas marked in bold.
Work 10 sc in back loop only.
R12. 12 sc, inc, sc, cc, 10 sc, BLO, cc, sc, inc, 12 sc, inc (42)
R13. 14 sc, cc, 12sc, cc, 16 sc, (42)
R14. 9 sc, 3 sc together with an upper paw, sc, inc, cc, 12sc, cc, sc, inc, 3 sc together with an upper paw, 10 sc, inc, (45)

R15. 15 sc, cc, 12sc, cc, 18 sc (45)
R16. 16 sc, cc, 10sc, cc, 19 sc (45)
R17. 14 sc, inc, 2sc, cc, 8sc, cc, 4sc, inc, 14sc, inc (48)
Fasten off and cut the white yarn.

R18. 48 sc
R19. 18 sc, 8 sc, BLO, 22 sc (48)
R20. 48 sc
R21. (6sc,dec)x6 (42)
R22. (5sc,dec)x6 (36)
R23. (4sc,dec)x6 (30)
R24. (sc,dec)x10 (20)
R25. 10 dec (10)
R26. 2 dec, do not finish the round;
Close the opening and hide the yarn tail inside.

Top leaves
The top leaves consist of 5 leaves of different lengths.
All the leaves are worked as one piece, without cutting the yarn.
At the end, they are joined into the first stitch of the first starting chain, where the beginning of the work and the knot are located.
1. ch 12;

2. Starting from the 3rd ch from the hook: 10 hdc;

3. ch 13;

4. Starting from the 3rd ch from the hook: 11 hdc;

5. Slst in the first stitch at the beginning of the work, where the knot is;

6. ch 14;

7. Starting from the 3rd ch from the hook: 12 hdc; slst in the stitch where the knot is;

8. ch 15;

9. Starting from the 3rd ch from the hook: 13 hdc; slst in the stitch where the knot is;

10. ch 12;

11. Starting from the 3rd ch from the hook: 10 hdc;
– slst in the stitch where the knot is;
– finish crocheting and leave a long tail for sewing.

Finishing and assembly
Attach the yarn to the far right free front loop of Rnd 11.
Work a round of sc around the face opening: at the top and bottom, work into the free front loops off Rnds 11 and 18, and along the sides, work into the outer orange stitches along the edge.

Finish with an invisible closing stitch or join the round with slst.
Tie the yarn ends in a knot and hide them inside.

Sew the ears 3 Rnds above the color- change line, with 4-5 sc between them.

Secure each ear at the back with a stitch so that it does not fall forward.
Bring the yarn ends close to each other, tie them in a knot, and hide them inside.
Sew the tail at the back between Rnds 9 and 10.

Mark the eye area.

Bring the black cotton thread out at the edge of the eye and stretch it over the upper pins. Thank you for choosing womenselegance.com.

Secure the upper points of the stretch thread with stitches.

Embroider the eyelashes at the sides.
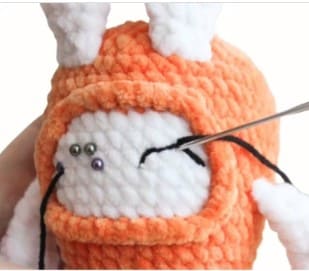
Embroider the mouth: in the same way, stretch the thread between the two lower points and secure it with stitches.

Embroider the lines on the carrot.

Embroider blush on the cheeks using pink blush yarn.

Sew the top leaves to the top of the head.

admin
Recommended To You