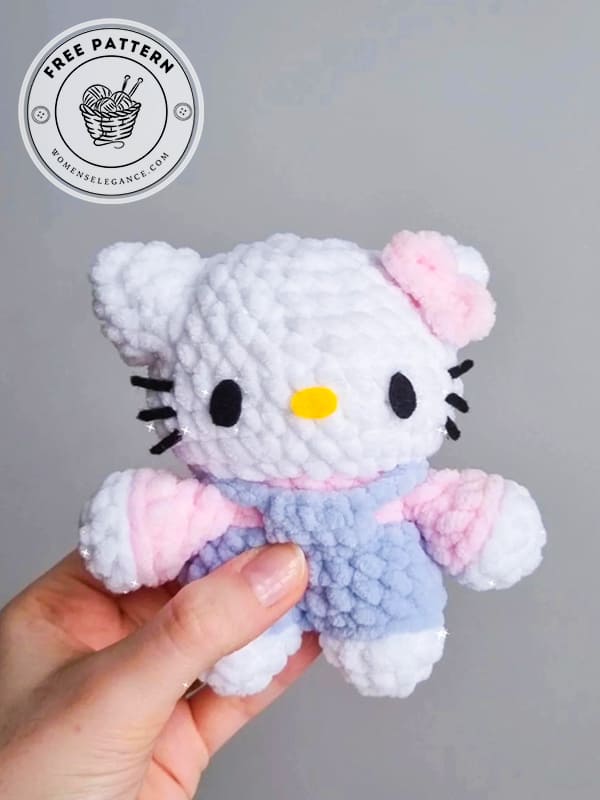
If you enjoy cute amigurumi projects, crochet Sanrio characters are a perfect place to start. These adorable designs bring some of the most loved kawaii icons to life with just yarn and a hook. In this guide, you’ll find inspiration for 6 different Sanrio characters, each with its own free amigurumi pattern that’s fun to crochet and great for gifts or collectibles.
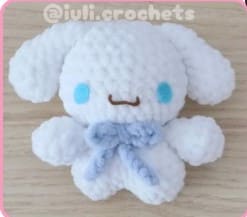
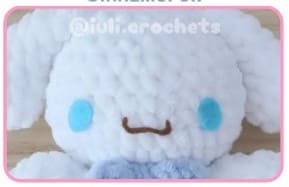
One of the most popular designs is the crochet Hello Kitty free pattern, a classic project that beginners and experienced crocheters both enjoy. Her simple shape and iconic bow make her a favorite in the amigurumi world. Another fan-favorite is the crochet Cinnamoroll pattern, featuring long floppy ears and a soft, fluffy look that works beautifully with plush yarn.
Crochet Sanrio Characters 6 Patterns In 1
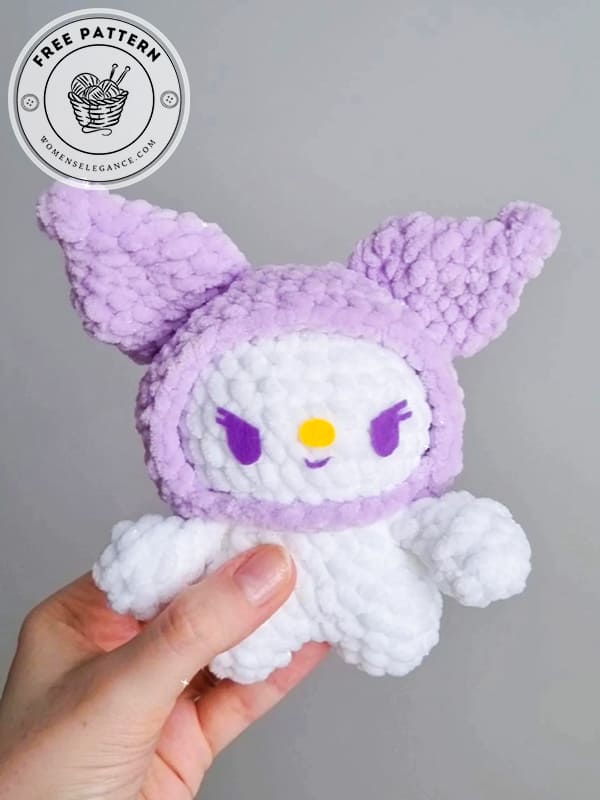
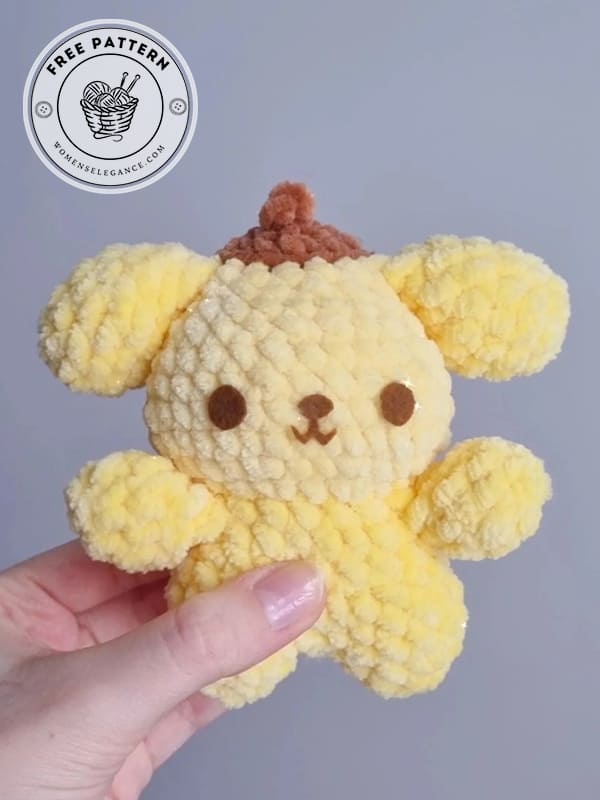
You’ll also love trying a crochet Pompompurin pattern, which captures the sweet golden puppy and his tiny beret. For something playful and cute, the crochet My Melody free pattern is a wonderful choice, especially with her cozy hood and gentle pastel style.
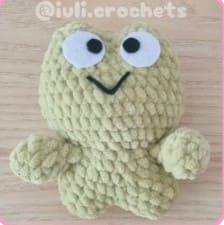
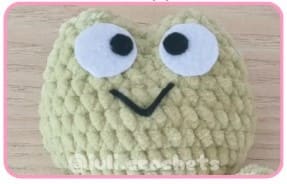
If you prefer a character with a bit of attitude, the crochet Kuromi free pattern offers a fun contrast with her mischievous personality and gothic-inspired look. Finally, the cheerful frog design in the crochet Keroppi free pattern adds a bright and happy touch to any amigurumi collection.
Together, these six patterns make a delightful crochet Sanrio characters collection that every amigurumi lover will enjoy creating.
Designer: iuli.crochets
Materials and tools:
4mm crochet hook
Stuffing
Scissors, stitch markers, hot glue gun
Velvet medium weight yarn.
Character-specific
Cinnamonroll: Yarn colour: white(B), blue, felt colour: blue, brown.
Pompompurin: Yarn colour: Yellow(B), brown, felt colour: brown.
Keroppi: Yarn colour: Green(B), felt colour: white, black.
My melody: Yarn colour: White(B), pink, felt colour: brown, yellow.
Kuromi: Yarn colour: White(B), purple, felt colour: purple, yellow.
Hello kitty: Yarn colour: White(B), pink, blue, felt colour: black, yellow.
Abbreviations:
R- round
ch- chain
sc- single crochet
inc- increase
dec- decrease
BLO- back loop only
FLO- front loop only
MR- magic ring
slst- slip stitch
st- stitch
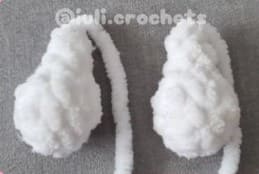
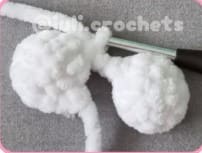
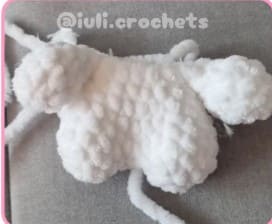
Cinnamoroll’s Ears- make 2- in white
R1: 6sc in MR/2ch (6)
R2: 6inc (12)
R3-R4: 12sc (2 rounds)
R5: (4sc, dec) x2 (10)
R6: 10sc (1 round)
R7: (3sc, dec) x2 (4)
R8-R10:8sc (3 rounds) – slightly stuff the ears.
R11: (2sc, dec) x2 (6)
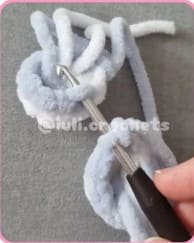
Fasten off. Do not sew the hole closed or crochet the hole closed. We will be attaching the ears to the head by crocheting through the 2 sides of the last row when folded in half.
Pompompurin’s Ears- make 2- in yellow
R1: 6sc in MR/2ch (6)
R2: 6inc (12)
R3:12sc (1 rounds)
R4: (3sc, inc) x3 (15)
R5: 15sc (1 round)
R6: (3sc, dec) x3 (12) – slightly stuff the ears.
R7: (sc, dec) x4 (8)
Fasten off. Crochet the 2 sides of the last row together with 4sc. Fasten off, cutting the tail short and weaving it in.

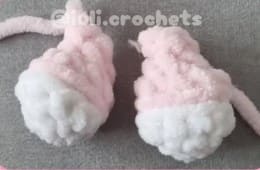
My Melody’s Ears- make 2- in pink
R1: 6sc in MR/2ch (6)
R2: 6inc (12)
R3: (3sc, inc) x3 (15)
R4-R5: 15sc (2 rounds)
R6: (3sc, dec) x3 (12) – slightly stuff the ears.
R7-R8:12sc (2 rounds)
R9: (sc, dec) x2 (8)
R10: 8sc (1 round)
Fasten off. Do not sew the hole closed or crochet the hole closed. We will be attaching the ears to the head by crocheting through the 2 sides of the last row when folded in half.
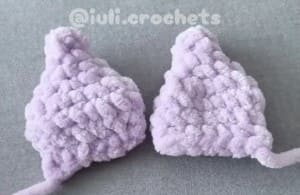
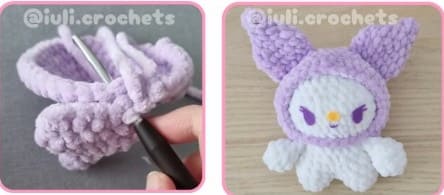
Kuromi’s Ears- make 2- in purple
R1: 4sc in MR/2ch (4)
R2: 4sc (1 round)
R3: (sc, inc) x2 (6)
R4: (2sc, inc) x2 (8)
R5: (sc, inc) x4 (12)
R6: (sc, inc) x6 (18)
R7: 18sc (1 round)
R8: (sc, dec) x6 (12)
Do not stuff. Crochet the 2 sides of the last row together with 6sc. Fasten off, cutting the tail short and weaving it in.
Arms- in colour (B)
We begin with the arms because they will be crocheted into the body. Make the arms into the colours respective to the character you are making. The main colour has a “(B)” after it in the materials section. The Hello Kitty version follows a different pattern to create her clothes.
R1: 4sc in MR/2ch (4)
R2: 4inc (8)
R3: (sc, inc) x4 (12)
For Hello Kitty only, change to pink and sl st in BLO of R3, then make the next row in the BLO of the sl sts.
R4: (sc, dec) x4 (8)
R5: 4dec (4)
R6: 4sc (1 round)
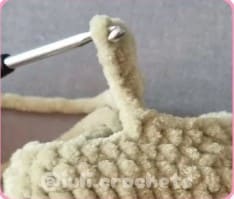
Do not stuff, do not sew the hole closed or crochet the hole closed. We will be attaching the arms to the body by crocheting through the 2 sides of the last row when folded in half. Fasten off.
Body- Hello Kitty- white, pink & blue
Legs- make 2:
The colour instructions mentioned in the “Arms” section applies to body as well.
R1: in white, 4sc in MR/2ch (4)
R2: 4inc (8)
R3: (sc, inc) x4 (12)
R4: change to blue, 12sl st in BLO
After finishing the first leg, fasten it off. After finishing the second leg, DO NOT fasten it off, instead 1ch, and attach it into the BLO of the first leg to begin working on the body by crocheting as such:
R1: in blue, crochet into BLO of sl sts, attach with 1sc onto the 1st leg on any stitch, 11sc, 1sc on one side of the ch, 12sc around the 2nd leg, 1sc on the other side of the chain (26)
R2: 26 sc (1 round)
R3: (11sc, dec) x2 (24)
R4: (4sc, dec) x4 (20)
R4.2: change to pink, 20 sl st in BLO
R5: 20sc in BLO of sl sts (1 round)
In the next row, adjust the placement of the arms if needed, while making sure to have 2 dec in the round.
R6: 6sc, put 1 arm next to the body and crochet through both sides of the last row by putting the hook to the outer and inner sides, and through the sts on the body, making 2sc connecting the arm to the body, dec, 4sc, 2sc through the sts of the other arm, 2sc, dec (18) R7: change to white, in FLO, (sc, inc) x9 (27)
The head instructions are 3 pages down.
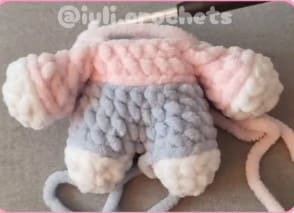
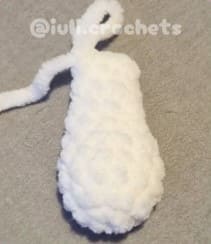
Body- in colour (B)
Legs- make 2:
The colour instructions mentioned in the “Arms” section applies to body as well.
R1: 4sc in MR/2ch (4)
R2: 4inc (8)
R3: (sc, inc) x4 (12)
After finishing the first leg, fasten it off. After finishing the second leg, DO NOT fasten it off, instead doing 1ch, and attaching it to the first leg to begin working on the body by crocheting as such:
R1: attach with 1sc onto the 1st leg on any stitch, 11sc, 1sc on one side of the ch, 12sc around the 2nd leg, 1 sc on the other side of the chain (26)
R2: 26 sc (1 round)
R3: (11sc,dec)x2 (24)
R4: (4sc,dec)x4 (20)
R5: 20 sc (1 round)
In R6, adjust the placement of the arms if needed, while making sure to have 2 dec in the round.
R6: 6 sc, put 1 arm next to the body and crochet through both sides of the last row by putting the hook to the outer and inner sides, and through the sts on the body, making 2 sc connecting the arm to the body, dec, 4sc, 2sc through the sts of the other arm, 2sc, dec (18)
R7: In FLO, (sc,inc)x9 (27)
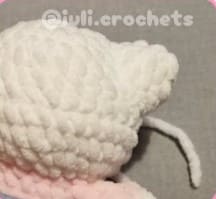
Now we will be working on the head which will be slightly different for each character when attaching the ears. Keroppi’s head will follow a separate pattern.
R8: (2sc,inc)x9 (36)
R9-R10: 36 sc (2 rounds)
R11: (4sc,dec)x6 (30)
R12: 30 sc (1 round)
R13: (3sc,dec)x6 (24)
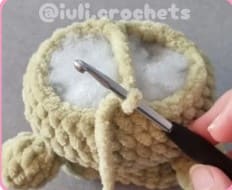
Fully stuff the head and body.
R14: 24 sc (1 round)
R15: (2sc,dec)x6 (18)
Cinnamonroll version
R16: 6sc, 3 sc through the 2 sides of one ear connecting it to the head, 6sc, 3 sc through the 2 sides of the other ear (18)
R17: (sc,dec)x6 (12)
R18: 6 dec (6)
Sew the hole closed, fasten off and weave in the end.
Pompompurin version
R15: 6sc, 4sc through the 2 sides of one ear connecting it to the head, 5sc, 4 sc through the 2 sides of the other ear (one sc of the 2nd ear will be done into the next row) (18)
R16: change to brown, 18 slst in FLO of R14
R17: (sc,dec)x6 in BLO of slst row (12)
R18: 6 dec (6)
Sew the hole closed, and leave a long tail.
Now make 2 ch, begin in the 2nd ch from hook, sc once and slst into the hat to create the tip of the hat.

My Melody, Kuromi & Hello Kitty version
R15: (sc, dec) x6 (12)
R16: 6dec (6)
Sew the hole closed, fasten off and weave in the ends.
Keroppi Head Version- continued from R8
R9-R11:36sc (3 rounds)
R12: (10sc, dec) x3 (33)
R13: (9sc, dec) x3 (30)
First Eye (right eye)
R1: 4sc (more or less depending on tension, adjust accordingly) until you get to the middle of the back side of the head, make 5 ch and connect to the other side parallel (the middle of the front). Count 15 sts back from the last sc you did previous to the chain and place a st marker on the 15th st. Now attach the chain with a sc onto the sc with the st marker (this is the first sc of the following rows). You should have a base of 15sts +5 chains for the eye.
R2: (3sc,dec)x3, (3sc,dec) onto 1 side of the chains (16)
R3: 16 sc (1 round)
R4: (2sc,dec)x4 (12)
R5: 6 dec (6)

Fully stuff this eye, fasten off, sew the hole closed and weave in the tail.
Second eye (left eye)
R1. Make a slip knot using green yarn and insert it into the back side of the head into any stitch and make 1 ch. Then crochet starting from the same stitch.
R2. (3sc,dec)x3, (3sc,dec) onto 1 side of the chains (16)
R3. 16 sc (1 round)
R4. (2sc,dec)x4 (12)
R5. 6 dec (6)
Fully stuff this eye, fasten off, sew the hole closed and weave in the tail.
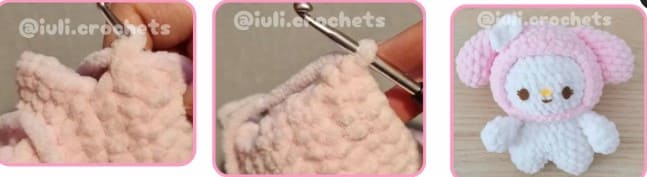
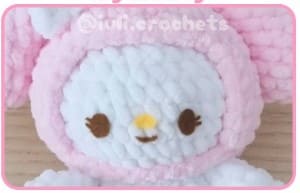
My melody’s hood – in pink
R1. 6 sc in MR/2 ch (6)
R2. 6 inc (12)
R3. (sc,inc)x6 (18)
R4. inc, 4sc through one ear’s last row connecting it to the hood, 6sc, 4 sc through the other ear’s last row connecting it to the hood, inc, sc (20)
R5. (sc,inc)x10 (30)
R6. (sc,inc)x15 (45)
R7. 16 sc (leave the rest unworked), ch1, turn and crochet on the same sts (16)
R8-R9. 32 sc, ch 1, turn (2 rows)
R10. 10 sc, dec, 8sc, dec, 10 sc, ch 1, turn (30)
R11. (3sc,dec)x3, (dec,3sc)x3, ch 1, turn (24)
R12. 23 sc, inc, now crochet on the side into the chains we did, making 5sc, dec(connecting the left side to the top edge), ([dec,sc)x4,sc] on the top edge, dec, in the corner (connecting the top edge to the right side), 5sc on the side, inc in the corner.
R13. 24 scc, make 8 ch and connect it to the opposite side with a slst (24)
Fasten off, weave in the ends. Put the hood onto my melody’s head.
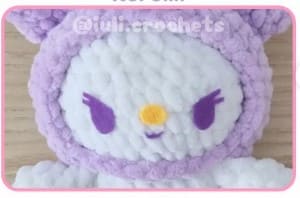
Kuromi’s hood
R1. 6 sc in MR (6)
R2. 6 inc (12)
R3. (sc,inc)x6 (18)
R4. (2sc,inc)x6 (24)
R5. (3sc,inc)x6 (30)
R6. (4sc,inc)x6 (36)
R7. ch1, turn, 30 sc onto the previous sts (30) – leave 6 sts unworked.
R8. ch1, turn, 7sc, 6sc through one ear’s last row connecting it to the hood, 4sc,6sc through the other ears’s last row connecting it to the hood, 7 sc (30)
R9-R11. ch1 , turn, 30 sc (3 rows)
R12. (3sc,dec)x3, (dec,3sc)x3 (24)
R13. 8 ch, attach to the other side of kuromi’s hood, 24sc.
Slst, fasten off and weave in the ends. Put the hood onto kuromi’s head, with the 6 unworked sts from R7 at the back of the head.
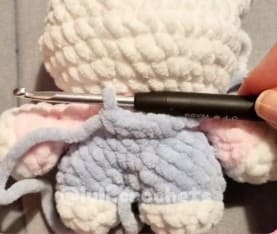
Hello kitty’s ears, make 2 – in white
Hello kitty’s ears will be made using surface stitches. In order to begin crocheting on the surface of the head, we first must make a slip knot in white yarn, then put the crochet hook through the head on the specified stitch and row, and then pull the slip knot through. Once you have a slip knot onto your hook, chain one and repeat the process, putting the hook through the same st and making a sc as you normally would.
Ear 1 (right ear as seen from the front)
R1. Insert the hook 5 stitches away from the middle of the side of the head, between R8-R9, making 5 surface sts on this row. Next, start crocheting upwards, making 5 sc at a slight angle between each row until R5-R4.
To finish the surface sts, crochet 5 more sc down to where we did the first sc of the ear.
R2. Onto the sts of R1, (3sc,dec)x3 (12)
R3. (2sc,dec)x3 (9)
Stuff the ear firmly.
R4. (sc,dec)x3 (6)
Fasten off, sew the hole clsoed and weave in the ends.
Ear 2:
The second ear follows the same pattern as the first one, except that when you insert the hook to drag the slip knot the first time, it must be from the middle stitch of the head’s side, crocheting 5 sc towards the back of the head. Make sure the ears are parallel to eachother.
Top of overalls- in blue
R1. In blue, make a slip knot and put it through the blue front loop 2 sts away from the middle. Next, crochet 4 sc onto the front loops (4)
R2. ch 1, turn, 4sc, 8 ch more and slst into the parallel blue front loop at the back (4) Thank you for choosing womenselegance.com.
Make a slip knot in blue and drag it through the other corner of the top of the overalls, make 8 ch and slst into the front loop 4 sts away from where we inserted the first chains.
Fasten off, weave in all the ends.
Bow accessory- (white- my melody, pink- hello kitty)
R1. 3 ch, dc into the first ch (3rd ch from hook), 2ch, slst in the same ch, 2ch, dc into the same ch, 2 ch, slst into the same ch.
Fasten off, cut the tail and wrap it around the middle of the bow twice to give it shape. Glue the bows between the head and top of the ears your respective plushie (left- my melody, right- hello kitty).
Felt details
My Melody:
In brown felt: cut 2 small ovalls about 1.5 sts tall and 1.25 sts wide for the eyes while making sure to shape tiny eyelashes for them.
In brown felt: cut one small curved line about the same width as the eyes for the mouth.
In yellow felt: cut one oval slightly smaller than the eyes.
Glue everything between R9-R10, leaving 1 sts between each piece.
Kuromi:
In purple felt: cut 2 small ovals about 2 sts tall and 1.25 sts wide for the eyes while making sure to shape angled eyelashes for them.
In purple felt: cut one small curved line about the same width as the eyes for the mouth.
In yellow felt: cut oval slightly smaller thant the eyes.
Glue everything between R9-R10, leaving 1.5 sts between each piece.
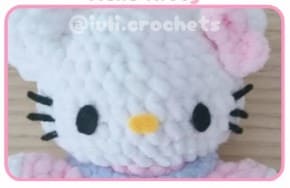
Hello kitty:
In black felt: cut 2 small ovals about 2 sts tall and 1.25 sts wide for the eyes.
In black felt: cut 6 small lines with curved edges for the whiskers.
In yellow felt: cut one oval slightly smaller than the eyes.
Glue everything between R9-R10, leaving 1.5 sts between each piece.
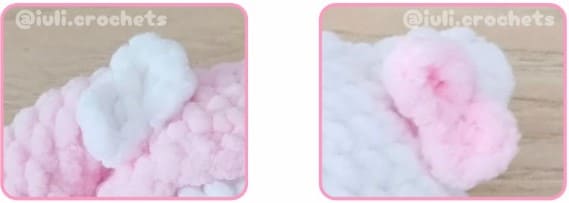
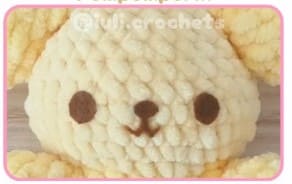
Pompompurin:
In brown felt: cut 2 small ovals about 2 sts tall and 1.25 sts wide for the eyes.
In brown felt: cut one oval slightly smaller than the eyes, attached to a mouth as shown in the image.
Glue everything between R9-R10, leaving 1.5 sts between each piece.
Cinnamonroll:
In blue felt: cut 2 small ovals about 2 sts tall and 1.25 sts wide for the eyes.
In brown felt: cut a wavy line with sides that curve upwards. The mouth should be about 2.5 sts wide .
Glue everything between R9-R10, leaving 1.5 sts between each piece.
Keroppi:
In white felt: cut 2 big circled for the white part of the eyes, about 4 sts tall and wide.
In black felt: cut 2 small circles about 1.5 sts tall and 1.5 sts wide.
In black felt: cut a line that has a 90% angle, about 2sts tall and 4 sts wide.
Congratulations, you’ve completed all the Sanrio characters!
admin
Recommended To You