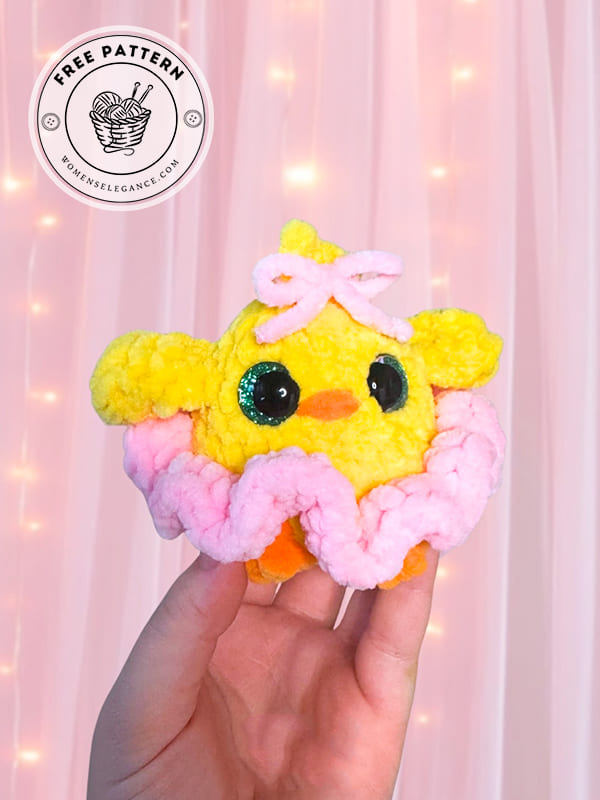
If you’re looking for a small, cheerful project for spring, a crochet easter chick pattern is one of the cutest things you can make. These tiny chicks are perfect for Easter decorations, handmade gifts, or even keychains. The fluffy chick in the example has a soft, round body, bright eyes, and a sweet pink ruffle that makes it look like it just popped out of a festive cupcake.
A simple crochet easter chick pattern usually starts with a small round body worked in continuous rounds using yellow plush or chenille yarn. This type of yarn helps create that soft, cuddly texture that makes amigurumi animals look extra adorable. After forming the body, the chick’s tiny wings are crocheted separately and attached to the sides. Small orange feet and a little beak bring the character to life.
What makes this design special is the decorative touch around the bottom. The pink ruffled edge adds a playful Easter vibe and gives the chick a cupcake-like shape. To finish the look, you can crochet a small bow and attach it to the top of the chick’s head. Large safety eyes will give your chick that cute, expressive look that everyone loves.
Free crochet easter chick pattern for beginners
If you are new to amigurumi, this is a wonderful beginner project. Many makers search for a free crochet easter chick pattern for beginners because it’s quick, simple, and doesn’t require complicated stitches. Most patterns only use basic stitches like single crochet, increases, and decreases.
A free crochet easter chick pattern for beginners is also a great way to practice shaping small amigurumi animals. Plus, these little chicks work up quickly, so you can easily make several to decorate Easter baskets, spring tables, or gift them to friends and family.
Designer: faithscuddlycreations
Abbreviations:
MR- magic ring
ch- chain
sc- single crochet
hdc- half double crochet
dc- double crochet
inc- increase
dec- decrease
slst- slip stitch
BO- bobble stitch
hdc inc- half double crochet increase
cc- color change
FO- fasten off
Materials:
Yarn #6 super bulky
Premier yarns parfait chunky or any other yarn of your choice.
5mm crochet hook.
Stitch markers.
Scissors.
Stuffing.
Safety eyes (12mm)
Darning needle.
Wings
Wings: make two:
R1. 6 dc in MR (6)
R2. 6 sc (6)
R3. 1 inc, 5 sc (7)
Fold in half, place 3 sc through both sides of the wings. FO, no need for a tail.
Body:
This pattern is worked from the bottom up. Keep in mind when stuffing you want to insure the bottom is flat so the chick can sit properly.
R1: 8sc in MR (8)
R2: 8inc (16)
R3: (1sc, linc)x8 (24)
R4: (2sc, linc)x8 (32)
In the next round the BO are made in orange for the feet. No need to mark first and last loop.
R5: BLO 13sc, BO, 4sc, BO, 13sc (32)
R6: 32sc (32)
R7: (65c, 1dec)x4 (28)
In the next round mark the first and last back loop for the tutu. FO orange yarn from feet.
R8: BLO 28sc (28)
R9: 28sc (28)
R10: (5sc, 1dec)x4 (24)
In the next round you will add the wings where it is underlined. Start to stuff the bottom and remember to keep the bottom flat.
R11: 5sc, 3sc, 10sc, 3sc, 3sc (24)
R12: (1sc, 1dec)x8 (16)
R13: 16sc (16)
Pause to add eyes between R11-12 about 2-3 sts apart.
R14: (2sc, 1dec)x4 (12)
R15: 6dec (6)
FO leaving a tail. Finish stuffing, sew your opening closed and tuck in ends.
Tutu:
Holding your plush upside down insert your hook into the marked front loop from R7.
Ch 2 then place 2 hdc in the same loop, continue to do 3 hdc in each front loop. Once you finish the round slst into your ch2, FO and tuck in your ends. I like to fluff my tutu and rearrange it once finished.
Hair tufts:
Holding your plush upright and facing you insert your hook into the top of your plushie’s head. Ch 4 then slst back into the head. Ch 6 and slst back into the head. FO and weave in ends.
Beak:
Using a piece of orange yarn embroider the beak onto your plush. I like to put mine one row below the eyes.
admin
Recommended To You