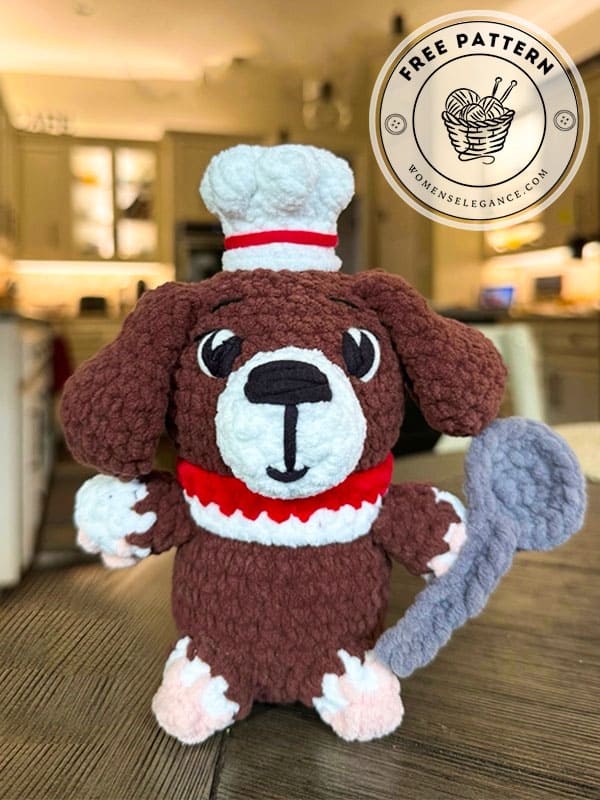
If you are looking for a fun and adorable project, the Chef Crochet Puppy Dog is perfect for you. With its cute design and easy-to-follow instructions, this pattern is ideal for both beginners and experienced crocheters. Using this crochet puppy free pattern, you can create a charming amigurumi dog that will delight kids, friends, or even yourself.
The crochet puppy dog amigurumi free pattern allows you to explore your creativity while improving your crochet skills. You will enjoy crafting the small details, from the floppy ears to the tiny chef hat, which gives your puppy a playful and unique personality. Using soft yarn and safe stuffing materials ensures that your amigurumi crochet dog is both huggable and durable.
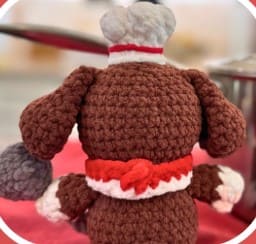
Chef crochet puppy free pattern
Crochet animals like this chef puppy are increasingly popular in the amigurumi world. They make perfect handmade gifts and can also be used as cute home decorations. The process of making these animals is relaxing and satisfying, especially when you see your puppy take shape row by row.
Creating a crochet dog is more than just following a pattern—it’s an opportunity to personalize your project. You can choose different yarn colors, add accessories like a little scarf or apron, or even create a matching set of crochet animals. With the free pattern, you have the flexibility to adapt and make your puppy as unique as you want.
Designer: dreamyducklingcrochet
Materials for chef puppy:
4 or 4.5 mm hook.
Chenille yarn, size 5 (bulky) in dark brown, white, gray, red and light pink.
Size 4 yarn (worsted weight) in black, white and red for embroidery and other details.
Stitch markers
Fiberfill
Tapestry needle
Optional: safety eyes, if you prefer to use them rather than embroider the eyes, sewing pins to pin pieces in place before sewing.
Abbreviations:
R- round
MR- magic ring
sc- single crochet
inc- increase
dec- decrease
BLO- back loop only
FO- fasten off
Inv FO- invisible fasten off
slst- slip stitch
BO- bobble stitch
Colors:
Color A: dark brown
Color B: white
Color C: gray/silver
Color D: red
Color E: light pink
This crochet puppy’s head and body will be made from one piece. Now you can carefully follow the instructions below.
Body and head
In color A (brown)
R1. Make 6 sc in a magic ring (6)
R2. 6 increase (12)
R3. (sc,inc)x6 (18)
R4. (2sc,inc)x6 (24)
R5. (3sc,inc)x6 (30)
R6-11. (6 rounds): 30 sc (30)
R12. (3sc,dec)x6 (24)
Start stuffing the body.
R13. (2sc,dec)x6 (18)
R14. 18 sc (18)
Finish stuffing the body firmly.
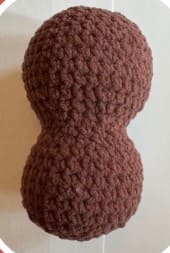
R15. (2sc,inc)x6 (24)
R16. (3sc,inc)x6 (30)
R17. (4sc,inc)x6 (36)
R18-22. (5 rounds): 36 sc (36)
Start stuffing the head and continue as you go.
R23. (4sc,dec)x6 (30)
If you’re using safety eyes, place them between R22 and R23, 6 stitches between them.
R24. 30 sc (30)
R25. (3sc,dec)x6 (24)
R26. (2sc,dec)x6 (18)
R27. (sc,dec)x6 (12)
Finish stuffing the head.
R28. 6 dec (6)
FO, leave a tail to sew the hole closed, pull tight and weave in ends.
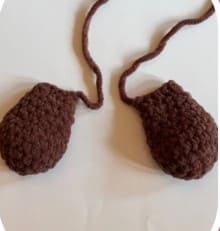
Ears (make 2)
In color A (brown):
R1. Make 6 sc in a MR (6)
R2. 6 inc (12)
R3. (sc,inc)x6 (18)
R4-6. (3 rounds): 18 sc (18)
R7. (sc,dec)x6 (12)
R8-9. (2 rounds): 12 sc (12)
R10. dec, (sc,dec)x3, sc (8)
Do not stuff the ear pinch the ear together, line up the stitches of round 10 and crochet 4 sc through both sides.
FO, leave a long tail for sewing the ears to the head.
Now, we will make the arms, legs, and paw pads in order.
Arms (make 2)
Begin in color B (white):
R1. Make 4 sc in a MR (4)
R2. 4 inc (8)
R3. 8 sc (8)
Change to color A (brown):
R4-6. (3 rounds): 8 sc (8)
Lightly stuff bottom of the arm, FO and leave a long tail for sewing arms to the body.
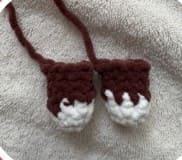
Feet (make 2)
Begin in color B (white):
R1. Make 4 sc in a MR (4)
R2. 4 inc (8)
Change to color A (brown):
R3. 8 sc (8)
Lightly stuff the feet, FO and leave a long tail for sewing to the body.
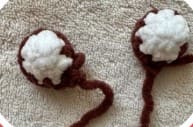
Paw pads (make 4)
In color E (light pink):
R1. Make 3 sc in a MR (3)
FO and leave a tail to sew to the arms and feet.
Alternative: embroider paw pads on arms and feet with pink yarn.

Snout
In color B (white):
R1. 8 sc in MR (8)
R2. 8 inc (16)
R3-4. (2 rounds): 16 sc in BLO (16)
Inv FO and leave a long tail for sewing to the head.

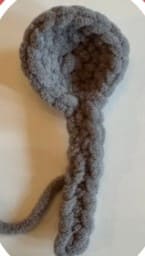
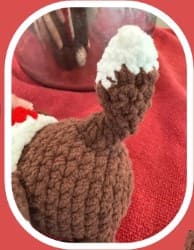
Tail
If not using plush yarn, stuff tail lightly as you make it.
Begin in color B (white):
R1. Make 4 sc in a MR (4)
R2. 4 inc (8)
R3. (sc,inc)x4 (12)
Change to color A (brown):
R4. (2sc,dec)x3 (9)
R5. 9 sc (9)
R6. 3sc, dec, 2sc, dec (7)
R7. 2 dec, 3 inc (8)
R8. 2 dec, 3 inc, 1 sc (9)
R9. 2 dec, 3 inc, 1 sc (10)
FO, leave a long tail for sewing to the body.
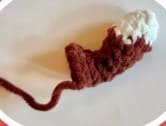
Spoon
In color C (Gray)
Rounds 1-3 are the bowl of the spoon.
R1: Make 6 sc in a MR (6)
R2: 6 inc (12)
R3: (3 sc, 3 inc) x 2 (18)
Slightly pinch the bowl at the bottom and slip stitch into the next stitch.
Round 4 is the spoon handle, it is worked in rows.
R4: Ch 9, skip first ch, 8 sc, slst into nearest stitch on bowl.
INV FO, leave a yarn tail to sew to the arm, thread the yarn tail through the back of the handle until it’s coming out 3 stitches under the bowl.
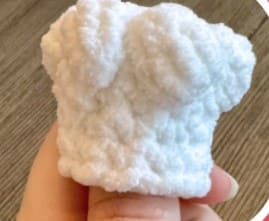
Chef hat
In white:
R1. Make 6 sc in a MR (6)
R2. 6 inc (12)
Note for R3: This is a 5 double crochet bobble stitch. Make sure to make the sc in the stitch right next to the BO stitch (it’s sometimes partially covered by the BO stitch).
R3. (sc,BO)x6 (12)
R4-6. (3 rounds): 12 sc (12)
INV FO, leave a long tail for sewing to the head.
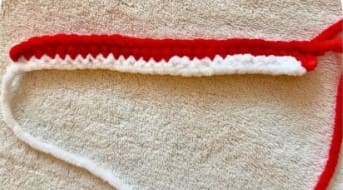
Collar
Worked in rows.
Begin in color D (red):
The chain number may have to be adjusted according to your yarn and tension.
Tie the chain around the neck, about 4-5 stitches should overlap with the other end, so that when the first round is finished, it will be long enough to wrap around the neck.
R1: Ch 28, skip first ch, 27 sc (27)
Change to color B (white):
R2: Ch 1, turn, 27 sc (27)
FO, leave tails on both red and white section to sew the collar together.
Assembly:
Ears:
• Sew the ear between rounds 25-26 of the body/head, centered on the head.
• The next 2 steps are optional to make the ears sit flatter on the head.
• After finishing sewing, bring the yarn tail out on the head underneath the ear, 3 rounds below the top of the ear.
• Bring the yarn tail back through the ear between rounds 3-4, then go one stitch over, through the ear and into the head to finish sewing the ears on.
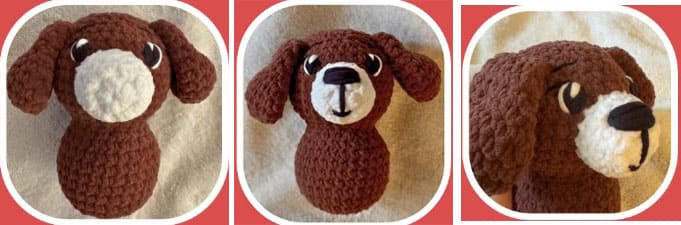
Eyes:
• If you didn’t use safety eyes, use worsted weight black yarn to embroider eyes between rounds 21-23 (7-9 rounds from the top), 6 stitches between them.
• Use worsted weight white yarn to embroider a border around the outside of eyes and a small notch in the middle.
• If you used safety eyes, embroider a white border around them.
Eyelashes & eyebrows:
• Use black embroidery thread to embroider eyelashes starting at the top outer corner of the eyes, and going one stitch over.
• Embroider eyebrows with the same black thread, starting 2 rounds (round 25) above the inner side of eye and going 3 stitches over and 1 round down.
Snout:
• Lightly stuff the snout.
• Sew the snout between rounds 17-22, centered between the eyes.
• Stuff a little more as you go.
• With worsted weight black yarn, embroider the nose horizontally over round 3 at the top of the snout, make the nose longer as you go until you get to your desired nose shape (approx 6-7 times).
• Embroider one vertical line from under the nose to the other side of round 1, then a horizontal line 2 stitches wide touching the vertical line, curved slightly so he’s smiling.
Paws:
• Sew paw pads on round 2-3 of the arms on the side, and round 1 of the feet, curved side pointing towards the end of the arm.
• Embroider 4 claws in the same color around the curved side of the paw 1-2 stitches apart depending on prefence.
Arms:
• Flatten the opening of the arms and sew through both sides to attach them onto the body on round 12, just before the head starts.
Feet:
• Sew the feet between rounds 4-7, centered in the front of the body, 1-2 visible stitches between each foot depending on prefence/yarn tension.
Tail:
• Sew tail on between rounds 4-7, centered on the back of the body.
Spoon:
• Sew the spoon over round 2 of the right arm, over the paw, with the spoon facing out and up at an angle.
• If the spoon bowl is flopping over too much, thread your yarn tail through it from behind and then back into the spoon handle and arm.
Chef hat:
• Tie red yarn (size 4) tightly around bottom of the chef hat.
• Don’t knot it, pull the two ends through the same hole to the inside of the hat, double knot inside and trim yarn.
• Sew the chef hat centered between the dog’s ears, over the last round (round 28), put the knot in the back.
• If you want a cleaner look at the bottom, wrap the white yarn tail tightly around the bottom of the hat 1-2 times before finishing sewing.
• Optional: lightly stuff the hat.
Collar:
• Wrap the collar tightly around the dog’s neck, so it covers the very top of the arms and top is a round under the snout (round 16).
• Make sure the two ends you’re sewing together are at the back.
• Pin the collar in place and sew together the white part of the collar with the white yarn tail, and the red part of the collar with the red yarn tail.
admin
Recommended To You